
Garage Door Aesthetic Enhancements: DIY Projects for a Stylish Upgrade
Your garage door is more than just a functional entry point—it’s a prominent feature of your home’s exterior that can greatly impact its curb appeal. Whether you’re looking to refresh your home’s appearance or add a personal touch, there are several DIY garage door aesthetic enhancements you can undertake. In this article, we’ll explore three exciting projects: painting your garage door, adding windows, and using creative decals and customizations. So get ready for DIY Projects for a Stylish Upgrade!
1. DIY Garage Door Painting: Tips and Tricks for a Professional Finish
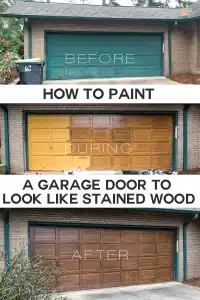
Painting your garage door can dramatically transform the look of your home. Here’s a step-by-step guide to achieving a professional finish:
Materials Needed:
- Exterior paint and primer
- Paint rollers and brushes
- Painter’s tape
- Drop cloths
- Sandpaper
- Cleaning supplies
Steps:
- Preparation: Start by cleaning the garage door thoroughly to remove dirt, grime, and any peeling paint. Use a mild detergent and water solution, and let the door dry completely. Sand any rough areas to create a smooth surface.
- Tape and Cover: Use painter’s tape to cover any hardware, windows, and edges you don’t want to paint. Lay drop cloths on the ground to protect your driveway from paint splatters.
- Prime the Surface: Apply a coat of exterior primer to the garage door, especially if you’re making a drastic color change or painting over metal. This will help the paint adhere better and last longer.
- Painting: Once the primer is dry, apply the exterior paint using a roller for larger areas and a brush for edges and corners. Start from the top and work your way down, applying thin, even coats. Allow each coat to dry completely before applying the next.
- Finishing Touches: After the final coat is dry, remove the painter’s tape and reattach any hardware you removed. Step back and admire your freshly painted garage door!
Tips for Success:
- Choose high-quality exterior paint designed to withstand weather conditions.
- Avoid painting in direct sunlight or extreme temperatures to prevent the paint from drying too quickly or unevenly.
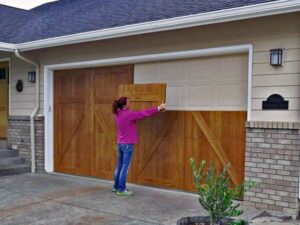
2. Adding Windows to Your Garage Door: A Stylish DIY Project
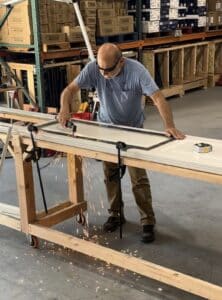
Windows can add a touch of elegance and sophistication to your garage door while allowing natural light into your garage. Here’s how to incorporate windows into your existing door:
Materials Needed:
- Garage door window insert kit
- Measuring tape
- Pencil
- Jigsaw or circular saw
- Drill
- Screwdriver
Steps:
- Select Window Placement: Decide where you want to place the windows on your garage door. Most people prefer them at the top for privacy, but you can choose any height that suits your aesthetic.
- Measure and Mark: Measure the dimensions of the window inserts and mark their positions on the garage door with a pencil.
- Cut the Openings: Use a drill to create starter holes at the corners of the marked areas. Then, use a jigsaw or circular saw to cut out the openings for the windows. Be sure to wear safety goggles and gloves during this step.
- Install the Windows: Insert the window frames into the openings and secure them with screws. Follow the manufacturer’s instructions for proper installation.
- Finishing: Once the windows are securely in place, clean any dust or debris. You may also choose to paint the frames to match the rest of the door.
Tips for Success:
- Ensure the window kit you choose is compatible with your garage door type and material.
- Double-check all measurements before cutting to avoid mistakes.
3. Creative Garage Door Decals and Customizations
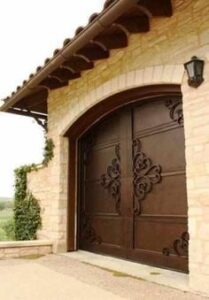
Garage door decals and customizations are a fun and easy way to add personality to your home. Whether you want to showcase a favorite sports team, create a seasonal theme, or add a unique design, decals can make your garage door stand out.
Materials Needed:
- Garage door decals or vinyl sheets
- Measuring tape
- Level
- Scissors or craft knife
- Squeegee or credit card
Steps:
- Choose Your Design: Select a design that reflects your style. You can purchase pre-made decals or create your own using vinyl sheets and a cutting machine.
- Prepare the Door: Clean the garage door surface to ensure it’s free of dust and debris. This will help the decals adhere better.
- Position and Apply: Measure and mark where you want to place the decals. Use a level to ensure they’re straight. Peel off the backing of the decals and carefully apply them to the door, smoothing out air bubbles with a squeegee or credit card.
- Trim and Adjust: Trim any excess material with scissors or a craft knife. Make any necessary adjustments to ensure the design looks perfect.
- Final Touches: Stand back and admire your customized garage door!
Tips for Success:
- Use weather-resistant decals designed for outdoor use to ensure durability.
- If you’re unsure about the placement, use masking tape to position the decals temporarily before applying them permanently.
Conclusion
Enhancing the aesthetics of your garage door can significantly boost your home’s curb appeal. Whether you opt for a fresh coat of paint, stylish windows, or creative decals, these DIY Projects for a Stylish Upgrade offer a cost-effective way to personalize your space. With a little time and effort, you can transform your garage door into a stunning focal point that reflects your style and taste. So, grab your tools and start your next garage door makeover today!